
Creating tutorials takes time—often more time than people expect. Between writing scripts, recording voice-overs, editing audio mistakes, and syncing everything with visuals, even short tutorials can turn into long projects. But if you’re using CapCut PC, things get a lot easier. One standout feature that speeds up the tutorial-making process is CapCut Text to Speech AI. It helps creators generate clear, natural-sounding voiceovers without any recording equipment or retakes. Whether you’re a teacher, content creator, gamer, or small business owner, this tool can completely change how fast you produce content.
Why CapCut Text to Speech AI Speeds Up Tutorial Creation
Before diving into the guide, it helps to understand what makes this feature such a time-saver:
- No Need for Recording Equipment
You don’t need a microphone, a quiet room, or audio editing software. The AI automatically generates clean audio that sounds ready to publish.
- Instant Script-to-Audio Conversion
You can turn any text—written instructions, notes, scripts, or even bullet points—into a voiceover instantly.
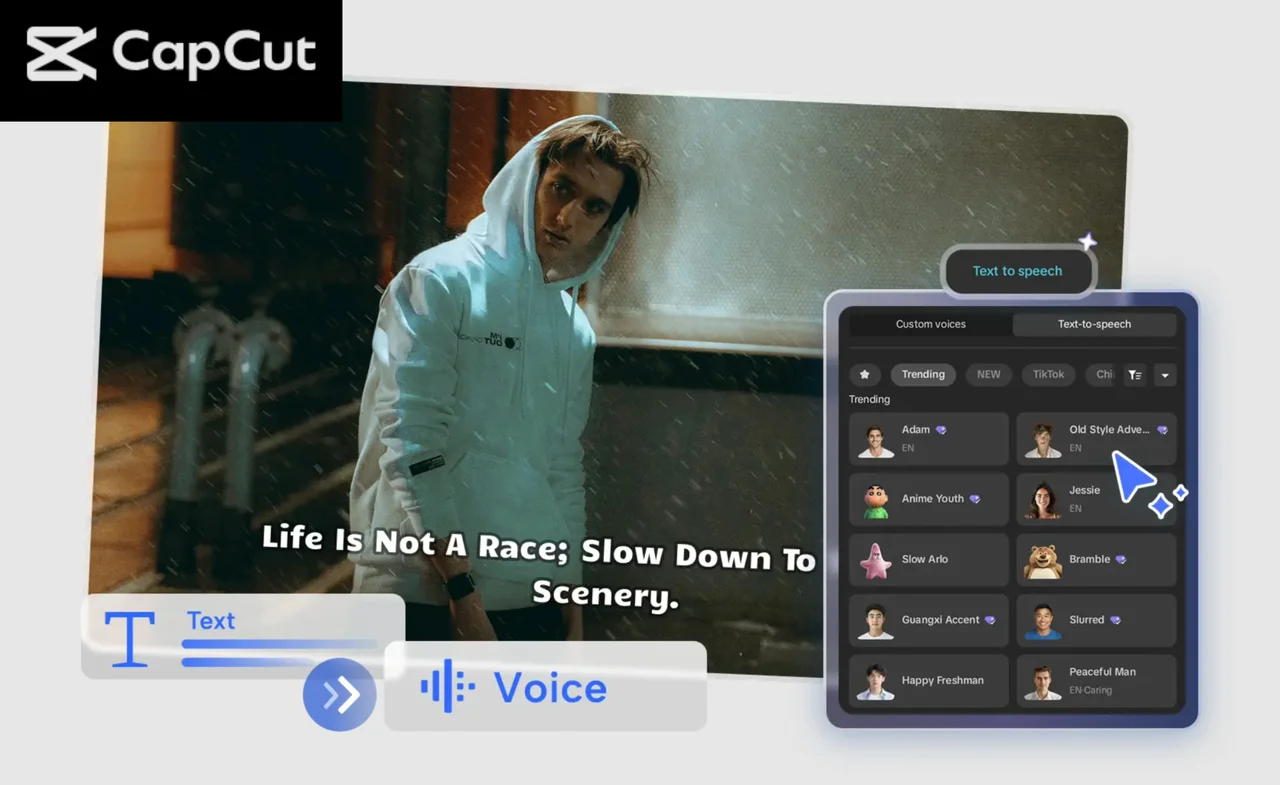
- Multiple Voice Styles for Different Audiences
CapCut offers a wide selection of voices, including friendly, professional, energetic, calm, robotic, and narrative. For tutorial creators, this means you can match your content’s tone without re-recording.
- Faster Editing and Fewer Retakes
Human recordings often require multiple takes, noise reduction, trimming, and timing adjustments. With Text to Speech, you can make corrections simply by editing the text.
- Perfect Sync Between Voice and Visuals
You can adjust timing and pacing easily by editing the script or tweaking the audio speed.
Together, these features help cut your production time by half—or even more.
How to Make Tutorials Faster with CapCut Text to Speech AI
Step 1: Upload your media and prepare your project
Begin by launching CapCut on your computer. Click “Create project” to start a new edit. Next, select “Import” to bring your screen recordings, demo footage, or tutorial visuals into the media library. Drag them onto the timeline to begin editing. If you are making a screen-recording tutorial, this is the perfect time to trim clips, remove mistakes, or arrange your visuals in the order your audience will follow. CapCut Desktop Video Editor allows you to cut, crop, and rearrange clips easily, so your tutorial flows smoothly from one step to the next.

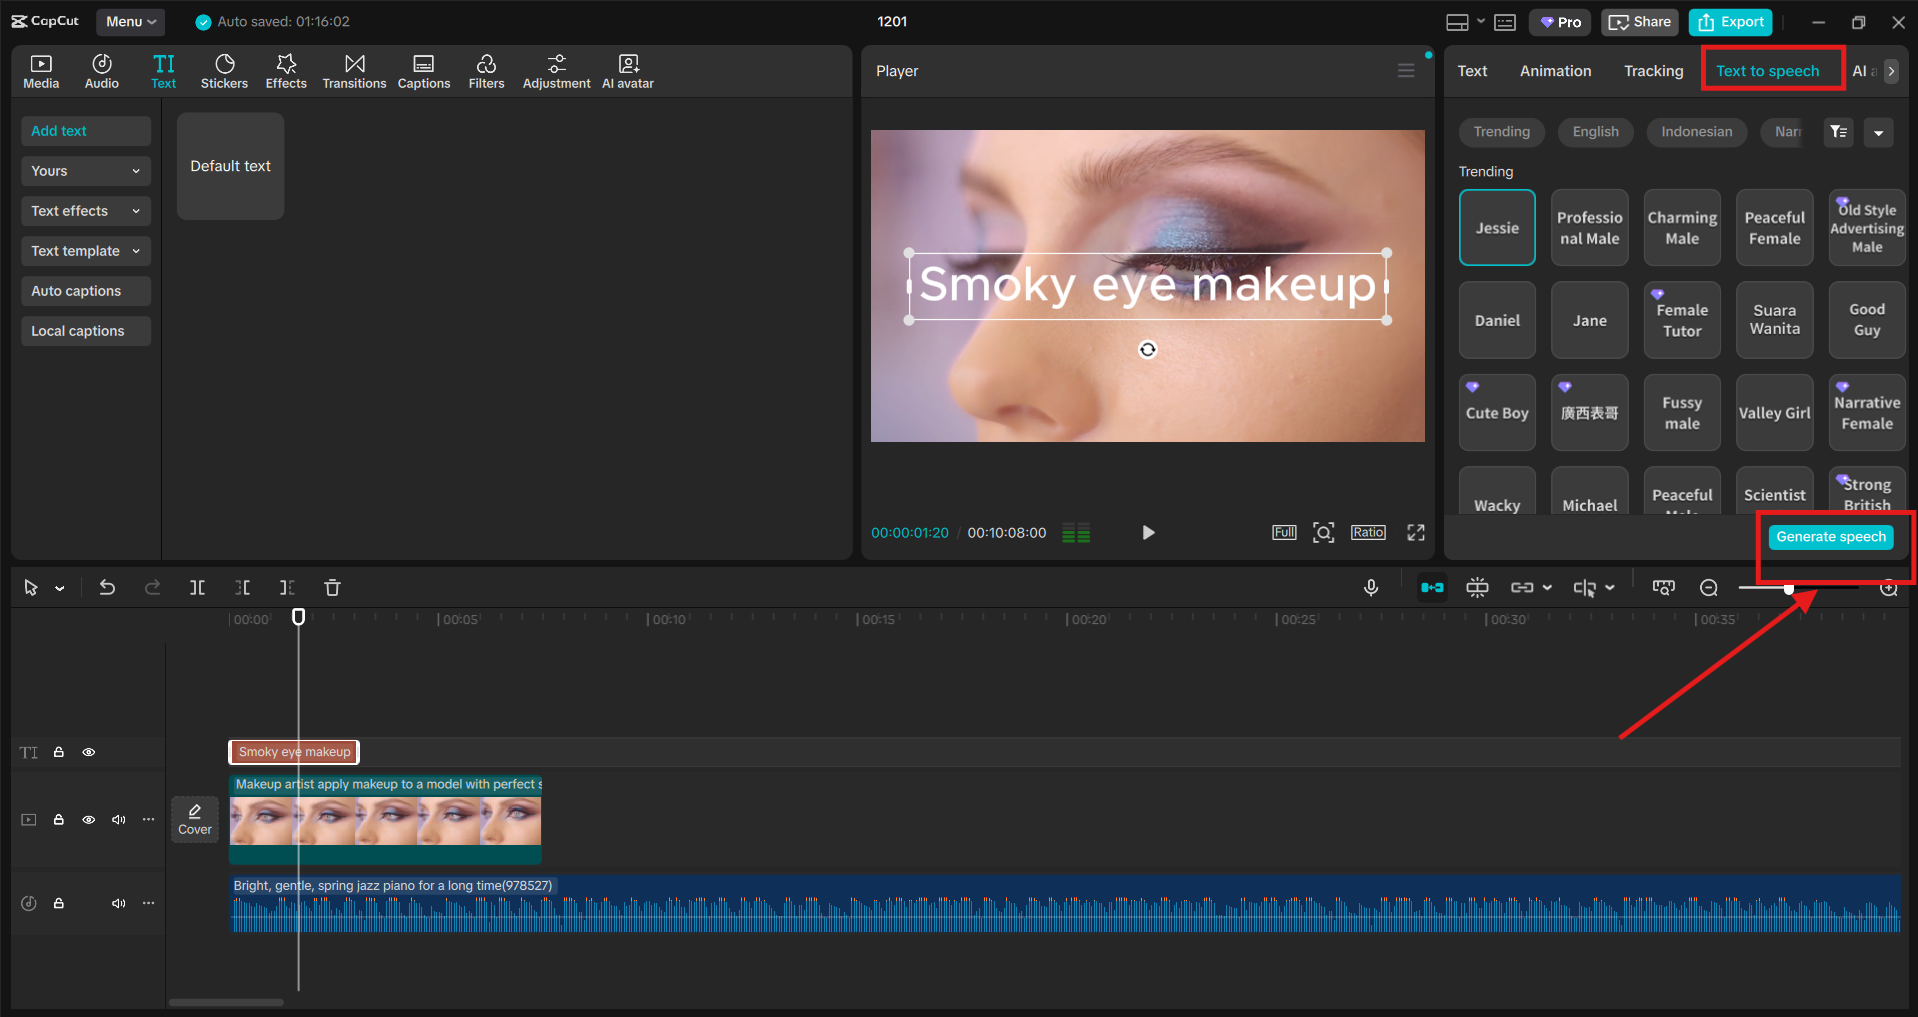
Step 2: Generate your tutorial narration using Text to Speech
Go to the right-hand panel and find the “Text” section. Select “Text to Speech” and paste or type your script into the text box. Now choose from CapCut’s wide selection of AI voices. You can preview each option to find one that best matches the style of your tutorial—whether it’s calm, energetic, serious, or friendly. Once you select a voice, click “Generate” to transform your script into AI narration. CapCut’s Text to Speech AI automatically generates clean, high-quality audio without background noise or microphone issues. You can also adjust the speed, pitch, or emotional tone to fit your content better.
After generating the audio, drag it onto the timeline beneath your video clips. If something sounds too fast, slow it down. If the script needs a fix, simply edit the text and regenerate the audio—much faster than re-recording. Try CapCut and other AI tools, such as AI Avatar, AI Video Generator, or BG Remover, to make your tutorial narration even more amazing.
Step 3: Finalize, export, and share your tutorial
Once your visuals and AI voiceover are aligned, move to the finishing touches. Adjust music levels, add captions, insert arrows or labels, or include transitions to make your tutorial clearer and more engaging. CapCut PC provides built-in templates, sound effects, effects, and overlays that work well with educational content.
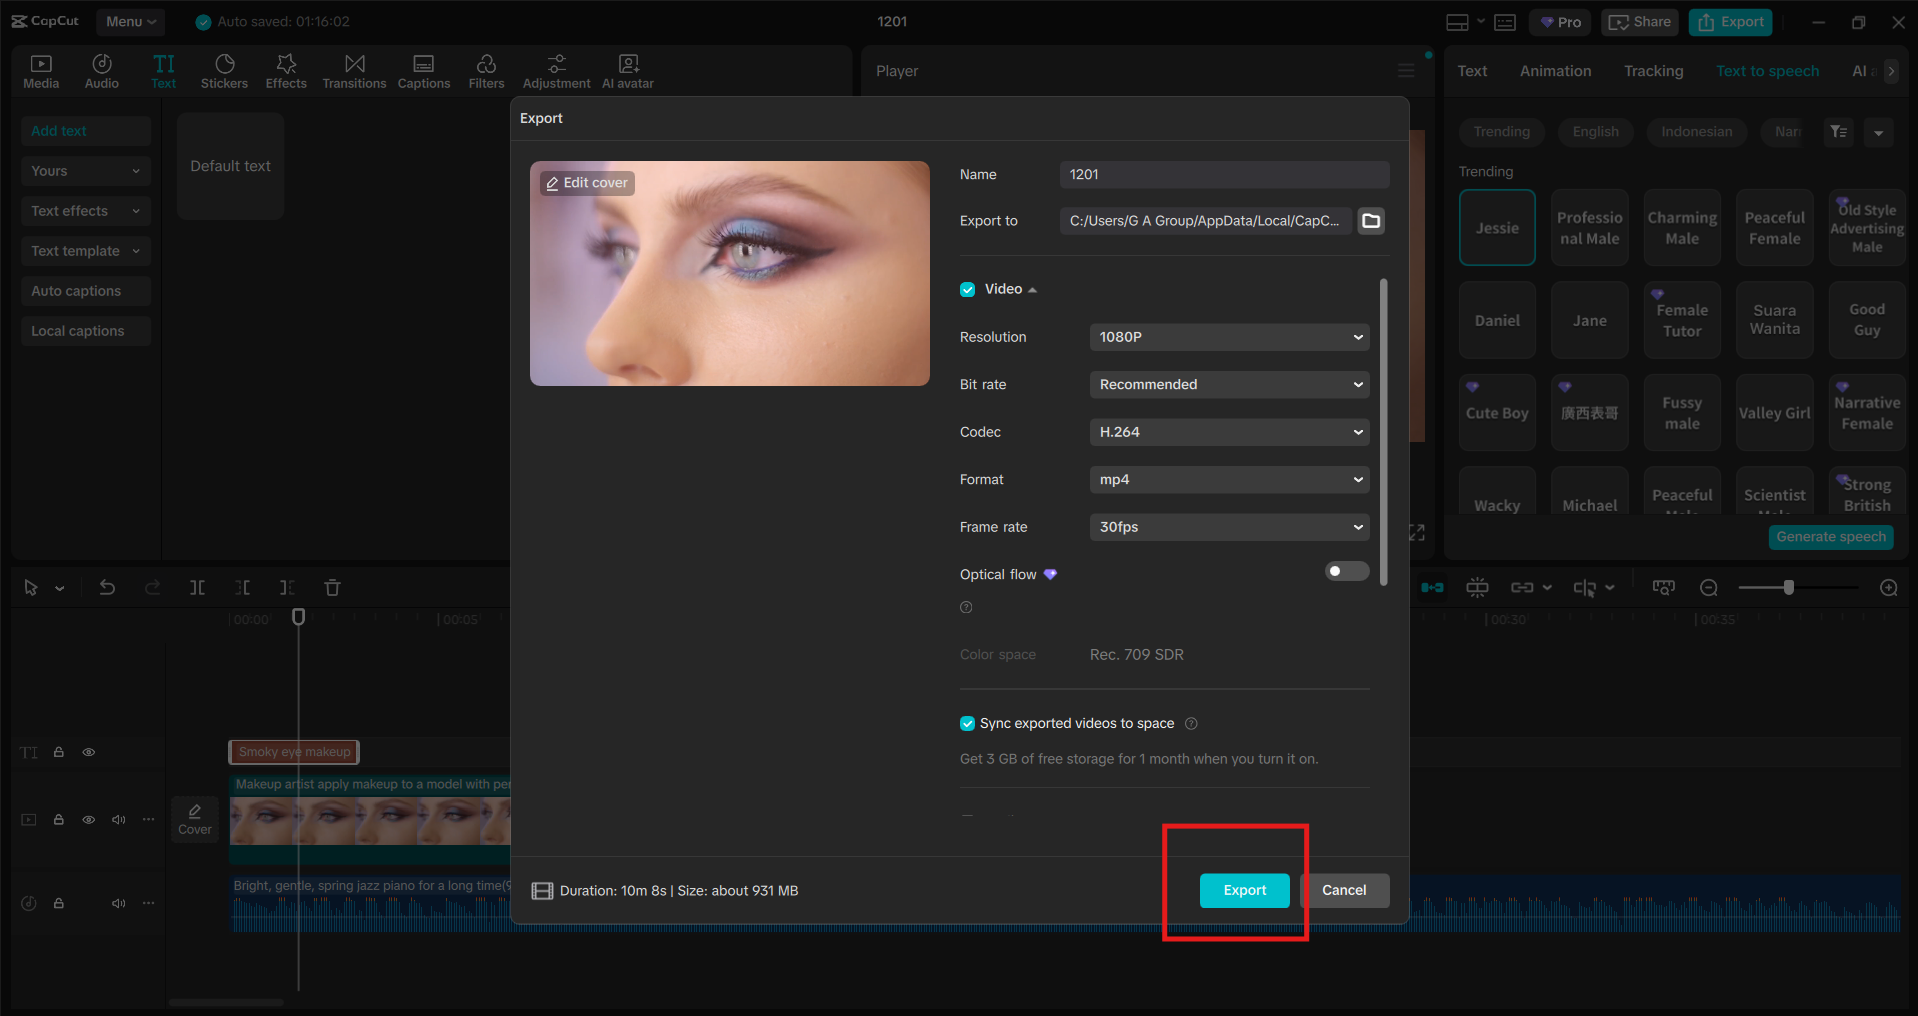
When everything looks polished, go to the “Export” section at the top. Choose your resolution, quality settings, and frame rate. For tutorial videos, 1080p at 30fps is usually ideal, but you can choose higher settings if needed. Export your video to your device, or share it directly from CapCut to your preferred platform—YouTube, TikTok, Facebook, Instagram, and others. Your video is now ready to upload without the slow process of recording, editing, and manually fixing voiceovers.
Tips to Make Your Tutorial Even Better with CapCut TTS
If you want your videos to look more professional, these built-in CapCut tools can help:
• Add On-Screen Text
Use text overlays to highlight important details, steps, shortcuts, or instructions.
• Include Subtitles Automatically
CapCut can generate subtitles with a single click, making your content more accessible and easier to digest.
• Use B-Roll Footage
Insert close-ups or alternate angles to keep viewers engaged.
• Add Sound Effects
Soft click sounds, transition swooshes, or subtle dings can make your tutorial feel more dynamic.
• Maintain Consistent Branding
Use the same fonts, intros, and colors in every tutorial for a professional look.
Conclusion
CapCut Text to Speech AI is a game-changer for anyone who wants to make tutorials quickly without compromising on quality. Instead of spending hours recording voiceovers, fixing mistakes, or managing audio equipment, you can create clear, engaging narration in minutes. Whether you’re a teacher, coach, business owner, or creator looking to speed up production, CapCut PC gives you everything you need inside one powerful editor.